Create a Contacts App for Apple Watch
-
 Image slide caption
 -
 Image slide caption
 -
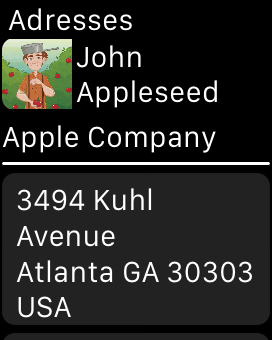 Image slide caption
In Watch OS1 we used “App Groups” to sync data. With the appearance with WatchOS2, that became deprecated.
With WatchOS 2 WCSession made its appearance and that is the new mantra for communicating with Apple Watch.
All you need is at least Xcode 7. The completed project can be downloaded at GitHub here
With WatchOS 2 WCSession made its appearance and that is the new mantra for communicating with Apple Watch.
All you need is at least Xcode 7. The completed project can be downloaded at GitHub here
1. Creating the project

Name your project Contacts
2. Create the contact list user interface
In the project, under Contacts WatchKit App,
- open the Interface.storyboard
- drag a tableview
- to the InterfaceController.
Next drag an image over the Table Row and set the size to 30 x 30 and the align vertical centre.
As with the image, drag a Label next to the image such that it has
- a line size 2
- vertical alignment is centre
- both the width and height is set to "Size to for content"
-
 Image slide caption
 -
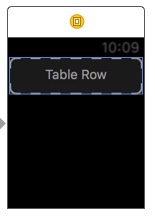 Image slide caption
 -
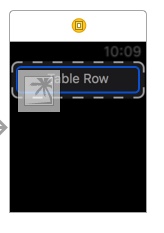 Image slide caption
 -
 Image slide caption
 -
 Image slide caption
3. Create the contact interface

In Xcode select File > New > WatchKit class.
- Name the class ContactRow
- let it be a subclass of NSObject
Make sure it is within the "Contacts WatchKit Extension" target.
Once created we need "hookup" the ContactRow Class with the table row controller. Select Table Row controller within the Table interface.
On the right hand pane, change the class to ContactRow.
Next Add outlets
On the right hand pane, change the class to ContactRow.
Next Add outlets
- for the image called contactPicType
- for the Image and name for the Label
-
 Image slide caption
 -
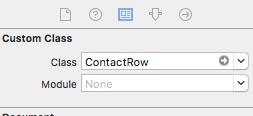 Image slide caption
 -
 Image slide caption
Add a NSString property: @property (nonatomic, strong ) NSString *identifier
Your class should look like this:
Your class should look like this:
#import < Foundation/Foundation.h >
#import < WatchKit/WatchKit.h >

@interface ContactRow : NSObject
@property (unsafe_unretained, nonatomic) IBOutlet WKInterfaceImage *contactPicType;
@property (unsafe_unretained, nonatomic) IBOutlet WKInterfaceLabel *name;
@property (nonatomic, strong ) NSString *identifier;
@end
4. Create tableview interface
Next we create and tableView Outlet by dragging the Table View in the interface controller to interface controller.m

Next we override the didSelectRowAtIndex method in InterfaceController.h The interface controller should like:
@interface InterfaceController : WKInterfaceController
@property (unsafe_unretained, nonatomic) IBOutlet WKInterfaceTable *tableView;

- (void)table: (WKInterfaceTable *)table didSelectRowAtIndex: (NSInteger)rowIndex;
@end
5. Create CNContactStore and Load Contact Names
The CNContactStore is a thread-safe class that will fetch the contact we want to display on our Apple Watch.
We create a new method
- (void) loadContacts
in InterfaceController.m and the first order of business is to create a copy of the store with
CNContactStore *store=[[CNContactStore alloc] init];
followed by asking permissions to read the contacts
[store requestAccessForEntityType:CNEntityTypeContacts completionHandler:^(BOOL granted, NSError * _Nullable error)
{
}];
In the execution block we will add the code that will read the contacts
 if (granted == YES)
         {
            [self setTitle:kLoading];
             NSArray *keys = @[CNContactFamilyNameKey,
                               CNContactGivenNameKey,
                               CNContactPostalAddressesKey,
                               CNContactOrganizationNameKey,
                               CNContactTypeKey
                               ];
If we are granted access we start the loading by changing the title to tell the user we buy fetching the contacts. At the top of the interface I placed
static NSString *const kContacts=@"Contacts";
static NSString *const kLoading=@"Loading...";
We also specify the keys we want to retrieve. We do not want to retrieve the keys we need now because:
NSString *containerId = store.defaultContainerIdentifier;
NSPredicate *predicate = [CNContact predicateForContactsInContainerWithIdentifier:containerId];
We also create a predicate to retrieve contacts in the default container. You might ask "how can I create specific predicates", well at the time I'm writing, they are very limited and you can not for example specific some like "address.count() >0". Hopefully Apple will extend current CNContacts framework to allow them in the future. Next we load all the contacts into an array:
NSError *error;
NSArray *allContacts = [store unifiedContactsMatchingPredicate:predicate keysToFetch:keys error:&error];
and once we have them we loop through to filter out the ones we do not want. In this case we only seeking contact that has Postal addresses populated:
static NSString *const kContacts=@"Contacts";
static NSString *const kLoading=@"Loading...";
We also specify the keys we want to retrieve. We do not want to retrieve the keys we need now because:
- Data would be fetch from you iPhone via Bluetooth and can be time consuming.
- The Apple watch has limited memory and fetching too much data will cause results in out of memory and might your Apple watch App might be terminated (unexpected).
NSString *containerId = store.defaultContainerIdentifier;
NSPredicate *predicate = [CNContact predicateForContactsInContainerWithIdentifier:containerId];
We also create a predicate to retrieve contacts in the default container. You might ask "how can I create specific predicates", well at the time I'm writing, they are very limited and you can not for example specific some like "address.count() >0". Hopefully Apple will extend current CNContacts framework to allow them in the future. Next we load all the contacts into an array:
NSError *error;
NSArray *allContacts = [store unifiedContactsMatchingPredicate:predicate keysToFetch:keys error:&error];
and once we have them we loop through to filter out the ones we do not want. In this case we only seeking contact that has Postal addresses populated:
                 for (CNContact *object in allContacts)
                 {
                     if ([object isKeyAvailable:CNContactPostalAddressesKey])
                     {
                         if (object.postalAddresses.count>0)
                         {
                             [self addContactToTable:object];
                         }
                     }
                 }
The -(void) addContactToTable: (CNContact *)contact method adds the contact to the table, we get to that win a moment. At the end of the loading loop, we change the title to something that will indicate that we have finished with loading the contacts
[self setTitle:kContacts];
[self setTitle:kContacts];
6. Adding a Contact Name Row to the Table
We be will be appending a new row to the table as we receive another contact name.
We need to know the index of the new row, and that is simply the number of rows already in the table:
We need to know the index of the new row, and that is simply the number of rows already in the table:
static NSString  *const kContactRowIdent=@"ContactRowIdent";

    NSInteger newRowIndex=self.tableView.numberOfRows;
    NSIndexSet *newRowIndexSet=[NSIndexSet indexSetWithIndex:newRowIndex];

    [self.tableView insertRowsAtIndexes:newRowIndexSet withRowType:kContactRowIdent] ;
    ContactRow *row=[self.tableView rowControllerAtIndex:newRowIndex] ;
We need to link and connect the contact row identifier with the interface builder by setting the Row Identifier to ContactRowIdent
-
 Image slide caption
Add two images
static NSString *const kAnonymousPerson=@"AnonymousPerson";
static NSString *const kAnonymousCompany=@"AnonymousCompany";
You copy the images from the project found on GitHub
- AnonymousPerson
- AnonymousCompany
static NSString *const kAnonymousPerson=@"AnonymousPerson";
static NSString *const kAnonymousCompany=@"AnonymousCompany";
You copy the images from the project found on GitHub
-
 Image slide caption
 -
 Image slide caption
The following code what image to display new the name by looking at the CNContactTypeOrganization and populate the row accordingly
   NSString *fullName=nil;
    NSString *orgName=nil;
    UIImage *Image=[UIImage imageNamed:kAnonymousPerson];

    if (contact.contactType==CNContactTypePerson)
    {
		fullName=[[NSString alloc] initWithFormat:@"%@ %@", contact.givenName, contact.familyName];
        orgName=contact.organizationName;
    }
    else if  (contact.contactType==CNContactTypeOrganization)
    {
        fullName=contact.organizationName;
        orgName=nil;
        {
            Image=[UIImage imageNamed:kAnonymousCompany];
        }
    }

 [row.name setText:fullName];
 [row.contactPicType setImage:Image];
 row.identifier=contact.identifier;
If you run the code we should be able to populate the interface controller which would typically look like this:
7. Create User Contact Details Interface
Next we will create a user interface to display the address details of a person. Go back to interface.storyboard and drag a new Interface Controller onto the storyboard
Name this new Interface controller "ShowContactDetails"
Name this new Interface controller "ShowContactDetails"
-
 Image slide caption
 -
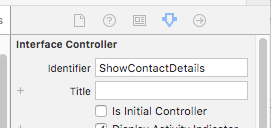 Image slide caption
Next drag a group container into the new interface controller.
-
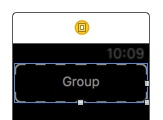 Image slide caption
Next drag an image view into the group and
- set width and height to 35
- align it to the centre vertical
-
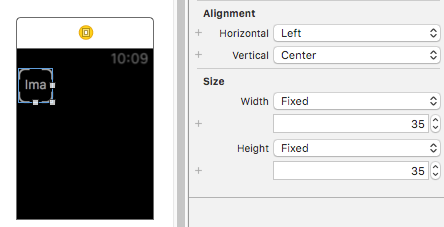 Image slide caption
Next add a Label and
- set the number of lines to 3
- set both the width and height as "size to fit content.
- align it to the centre vertical
- alight it to the left horizontal
-
 Image slide caption
Next add another label below the group contain and
- Set the font to Footnote
- number of lines 1
-
 Image slide caption
Next add a separate below the new label and drag the table below the separator.
Next we add two labels into the Table Row.
Next we add two labels into the Table Row.
-
 Image slide caption
 -
 Image slide caption
Next we want the two labels to be stacked vertical, to do that, select the group container.
-
 Image slide caption
Change the layout to Vertical
and size to fit content
and size to fit content
-
 Image slide caption
 -
 Image slide caption
Change the top label font to Subhead and set to bottom label to 5 lines
-
 Image slide caption
8. Create Contact Details Interface Classes
In Xcode select File > New > WatchKit class.
- Name the class PostalAdressRow
- let it be a subclass of NSObject
Make sure it is within the "Contacts WatchKit Extension" target.
In Xcode select File > New > WatchKit class.
- Name the class ContactDetailsInterfaceController
- let it be a subclass of WKInterfaceController
Make sure it is within the "Contacts WatchKit Extension" target.
In the Interface.storyboard select the ShowContactDetails controller.
Change the class from WKInterfaceController to ContactDetailsInterfaceController
Change the class from WKInterfaceController to ContactDetailsInterfaceController
-
 Image slide caption
 -
 Image slide caption
Next we create outlets to ContactDetailsInterfaceController.h
- The image as WKInterfaceImage *picture;
- The label next to image as WKInterfaceLabel *name;
- The label below image above the operator as WKInterfaceLabel *organisationName;
- The table as WKInterfaceTable *tableView;
- The class definition should look like this:
@property (unsafe_unretained, nonatomic) IBOutlet WKInterfaceImage *picture;
@property (unsafe_unretained, nonatomic) IBOutlet WKInterfaceLabel *name;
@property (unsafe_unretained, nonatomic) IBOutlet WKInterfaceLabel *organisationName;
@property (unsafe_unretained, nonatomic) IBOutlet WKInterfaceTable *tableView;
@end
9. Implement Contact Details Classes
In InterfaceController.m add the following
- (void) loadContact:(NSString *) identifier
{
    CNContactStore *store=[[CNContactStore alloc] init];

    [store requestAccessForEntityType:CNEntityTypeContacts completionHandler:^(BOOL granted, NSError * _Nullable error)
     {
         if (granted == YES)
         {
             [self setTitle:kLoading];

 NSArray *keys = @[CNContactFamilyNameKey, CNContactGivenNameKey,
                               CNContactImageDataAvailableKey,
                               CNContactThumbnailImageDataKey,
                               CNContactPostalAddressesKey,
								CNContactOrganizationNameKey,
								CNContactTypeKey
                               ];
The present controller will be passing the contact identifier as a context to ContactDetailInterfaceController.
In ContactDetailsInterfaceController.h add the 2 lines awakeWithContext to so that it looks like:
In ContactDetailsInterfaceController.h add the 2 lines awakeWithContext to so that it looks like:
- (void)awakeWithContext:(id)context {
    [super awakeWithContext:context];

    // Configure interface objects here.
    NSString *identifier=context;
    [self loadContact:identifier];

}
Implement loadContact such that the 1st few lines look the same as before in the loadContacts method elsewhere:
- (void) loadContact:(NSString *) identifier
{
    CNContactStore *store=[[CNContactStore alloc] init];

    [store requestAccessForEntityType:CNEntityTypeContacts completionHandler:^(BOOL granted, NSError * _Nullable error)
     {
         if (granted == YES)
         {
             [self setTitle:kLoading];

 NSArray *keys = @[CNContactFamilyNameKey, CNContactGivenNameKey,
                               CNContactImageDataAvailableKey,
                               CNContactThumbnailImageDataKey,
                               CNContactPostalAddressesKey,
								CNContactOrganizationNameKey,
								CNContactTypeKey
                               ];
the keys part will specify to load the image, Postal addresses of the contact. Next add this predicate that will only retrieve the details for the contact the user tapped on
NSPredicate *predicate = [CNContact predicateForContactsWithIdentifiers:@[identifier]];
and then load the contact details with this code
NSError *error;
NSArray *allContacts = [store unifiedContactsMatchingPredicate:predicate keysToFetch:keys error:&error];
Next we populate the user interface:
The setContactNameDetails method is similar to how the names are populates in 1st InterfaceController, see the addContactToTable method there.
The setContactAddressDetails is slightly different and be bit more complex. We need to retrieve two items from CNPostalAddress class:
To loop through the many postal addresses for our one contact we use the following loop:
for (CNLabeledValue *label in contact.postalAddresses)
we cast the first key value to a NSString to get the Universal Key Name
NSString *locationName=(NSString *)label;
and next we get a human readable value we get the localised string value using the localizedStringForLabel method of the CNLabeledValue class and set it directly into the label of that table row called row.locationName
[row.locationName setText:[CNLabeledValue localizedStringForLabel:locationName]];
To get the postal address we need retrieve the second value in the data structure
CNPostalAddress *adress=label.value;
and then we use the class CNPostalAddressFormatter to format the address into a human readable format:
NSString *location=[formatter stringFromPostalAddress:adress];
[row.locationAddress setText:location];
The second part populate the address label in the user interface. The complete method for setContactAddressDetails:
NSPredicate *predicate = [CNContact predicateForContactsWithIdentifiers:@[identifier]];
and then load the contact details with this code
NSError *error;
NSArray *allContacts = [store unifiedContactsMatchingPredicate:predicate keysToFetch:keys error:&error];
Next we populate the user interface:
- [self setContactNameDetails:object]; that set picture, Name and company name
- [self setContactAddressDetails:object]; that set the address type and the address.
The setContactNameDetails method is similar to how the names are populates in 1st InterfaceController, see the addContactToTable method there.
The setContactAddressDetails is slightly different and be bit more complex. We need to retrieve two items from CNPostalAddress class:
- The location type name, that can work, home, office, other, etc. It can be anything and can be an unlimited set of things.
- The location address that are more simple, that is in a pre defined address data structure.
To loop through the many postal addresses for our one contact we use the following loop:
for (CNLabeledValue *label in contact.postalAddresses)
we cast the first key value to a NSString to get the Universal Key Name
NSString *locationName=(NSString *)label;
and next we get a human readable value we get the localised string value using the localizedStringForLabel method of the CNLabeledValue class and set it directly into the label of that table row called row.locationName
[row.locationName setText:[CNLabeledValue localizedStringForLabel:locationName]];
To get the postal address we need retrieve the second value in the data structure
CNPostalAddress *adress=label.value;
and then we use the class CNPostalAddressFormatter to format the address into a human readable format:
NSString *location=[formatter stringFromPostalAddress:adress];
[row.locationAddress setText:location];
The second part populate the address label in the user interface. The complete method for setContactAddressDetails:
- (void) setContactAddressDetails: (CNContact *) contact
{
    if ([contact isKeyAvailable:CNContactPostalAddressesKey])
    {
        CNPostalAddressFormatter *formatter=[[CNPostalAddressFormatter alloc] init];
        [self.tableView setNumberOfRows:contact.postalAddresses.count withRowType:kPostalAddressRow];
        NSInteger rowIndex=0;
        for (CNLabeledValue *label in contact.postalAddresses)
        {
            PostalAdressRow *row=[self.tableView rowControllerAtIndex:rowIndex];

            NSString *locationName=(NSString *)label;
            [row.locationName setText:[CNLabeledValue localizedStringForLabel:locationName]];

            CNPostalAddress *adress=label.value;
            NSString *location=[formatter stringFromPostalAddress:adress];
            [row.locationAddress setText:location];

            rowIndex++;

        }
   }
}
Demo
Wrapping up and things to consider
I hope the above might have helped you.There are a few things you might want to consider when you use the same methodology as above are:
I hope the above might have helped you.There are a few things you might want to consider when you use the same methodology as above are:
- remember in real life the watch and iPhone combinations happen via bluetooth and interference might slot down that you otherwise won’t detect in the simulators.